おもちゃラボ

Unityで遊びを作ってます

Raspberry Piで猫の定点カメラ(監視カメラ)を作る

旅行に出かけるときや外出時など、猫がちゃんと一人でお留守番できてるかどうか心配ですよね〜。そこで、Raspberry Pi zeroを使って猫を定点観察する定点カメラ(監視カメラ)をつくってみました。

今回は、30分ごとにRaspberry Piのカメラで撮影した室内画像をSlackに投稿するようにしてみました。

f:id:nn_hokuson:20171011202941p:plain

今回の記事の内容は次の通りです。

まずは機材を準備する

今回使用したのはRaspberry Pi zeroとスターターセット、Raspberry Pi用のカメラモジュールです。Raspberry PiはAmazonではボッタクリ価格(元値は600円程度)なので、スイッチサイエンスなどで販売されるのを待ったほうが良いと思います。

www.switch-science.com

Raspberry Pi Zero(W)の場合は無線モジュールが内蔵されているので、スターターキットは不要かもしれません。

[asin:B01LZI7IAY:detail]

また、Raspberry Pi zeroでカメラモジュールを使う場合は、次のどちらかの方法を利用します。

  1. ラズパイゼロ用のカメラモジュールを使う
  2. ラズパイ用のカメラモジュールと変換ケーブルを使う

ラズパイゼロ専用のカメラモジュールを使う場合はこちらで購入できます。純正なので安心して使えますが、少々お値段は高くなります。

[asin:B06XFPPBCW:detail]

変換ケーブルを使う場合は次の「Raspberry Pi zero用変換ケーブル」と「カメラモジュール」の2点を購入することになります。私は次の2点を購入してみましたが、問題なく動作しました。

[asin:B01FS46E7K:detail]

Raspberry Pi zeroのセットアップについてはこちらの記事で解説しているので参考にしてみてください。

nn-hokuson.hatenablog.com

カメラを接続する

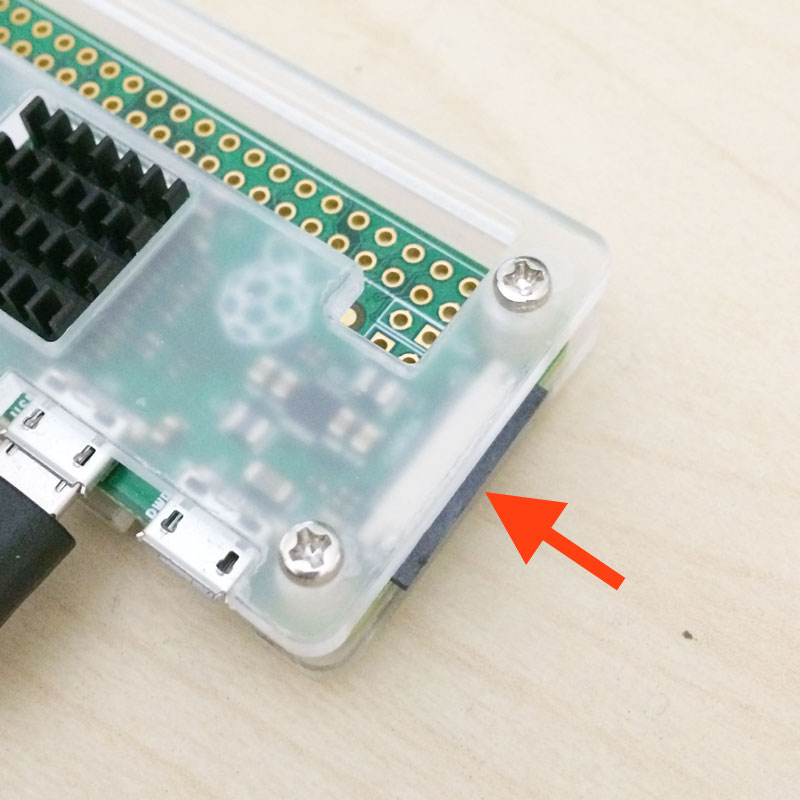
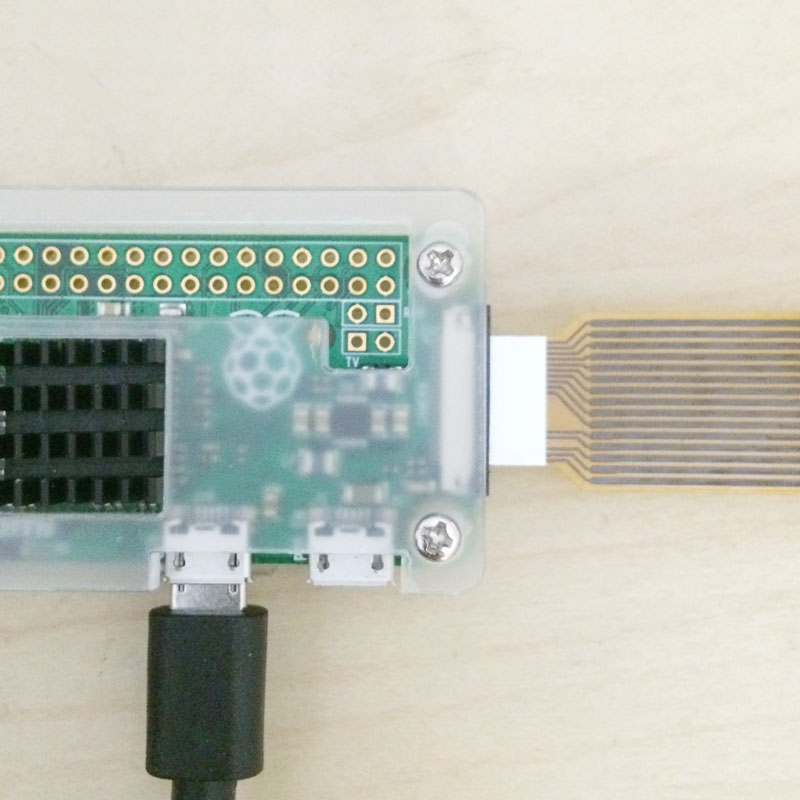
最初に見たとき、どうやってケーブルをRaspberry Piに差し込むのか、全然分からず無理やりカメラケーブルを押し込んでみたり(笑)

まずは黒い出っ張りを手前に引きます。すると黒い出っ張りと基板の間にスペースができるのでそこにカメラケーブルを差し込みます。裏表に注意してください。基板側に金属端子が向くように接続します。

f:id:nn_hokuson:20171010210444j:plain:w300 f:id:nn_hokuson:20171010210430j:plain:w300

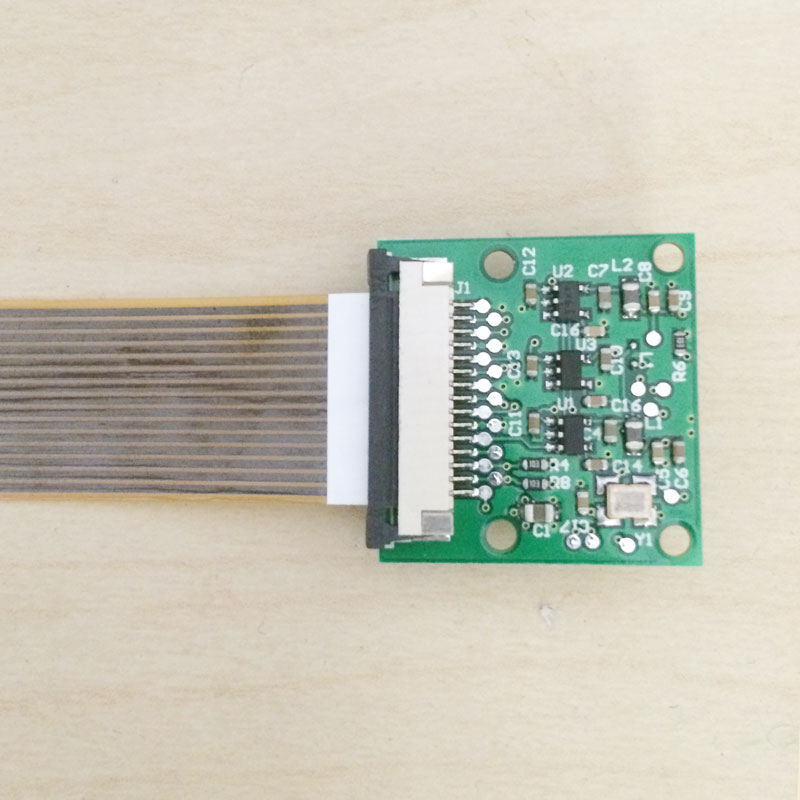
カメラモジュールの方も同じ要領でケーブルとカメラの基板を接続してください。raspberry pi zeroの場合、どちらもケーブルの白い目印が上にくるはずです。

f:id:nn_hokuson:20171010210533j:plain:w300

Raspberry Piのカメラで撮影してみる

Raspberry Piでカメラを撮影するのは非常に簡単です。まずはカメラを有効にしてRaspberry Piからカメラを認識できる状態にします。次のコマンドを入力してください。

sudo raspi-config

続いて「Interface Options」を選択してエンターキーを押します。

f:id:nn_hokuson:20171010211437j:plain:w500

「P1 Camera」を選択し、エンターキーを押すとカメラを有効にするかどうかを聞かれるので、「Yes」を選択します。

f:id:nn_hokuson:20171010211446j:plain:w500

その後「OK」を押して元の画面に戻り、「Finish」で設定を終了して下さい。これでカメラが使用できるようになりました。

カメラの設定ができたところで、raspistillコマンドを使って実際に撮影できるかどうかを確認しておきましょう。

raspistill -w 480 -h 320 -o test.jpg

撮影画像はこんな感じになりました〜(ぶりぶりざえもんカワイイ)。「-w」と「-h」のオプションでそれぞれ撮影画像の幅と高さを指定することができます。

f:id:nn_hokuson:20171010213014j:plain

raspistillコマンドのオプションについては次のサイトを参考にさせていただきました。RaspberryPiのカメラは露出やISOなども設定できるので結構きれいな写真が撮れます。

rapsberrycamera.seesaa.net

Slackにアップロードできるようにする

撮影した画像をSlackにアップロードするためには、次の作業が必要になります。

  1. Slackに開発アプリの登録
  2. Slackでの認証設定とTokenの発行
  3. Slackへの投稿プログラムの作成

では、それぞれの作業を一つづつ見ていきましょう。

Slackに開発アプリの登録

まずはSlackのアカウント登録したら、SlackToken発行ページからTokenを発行します。Tokenの発行は次のページから行えます。

api.slack.com

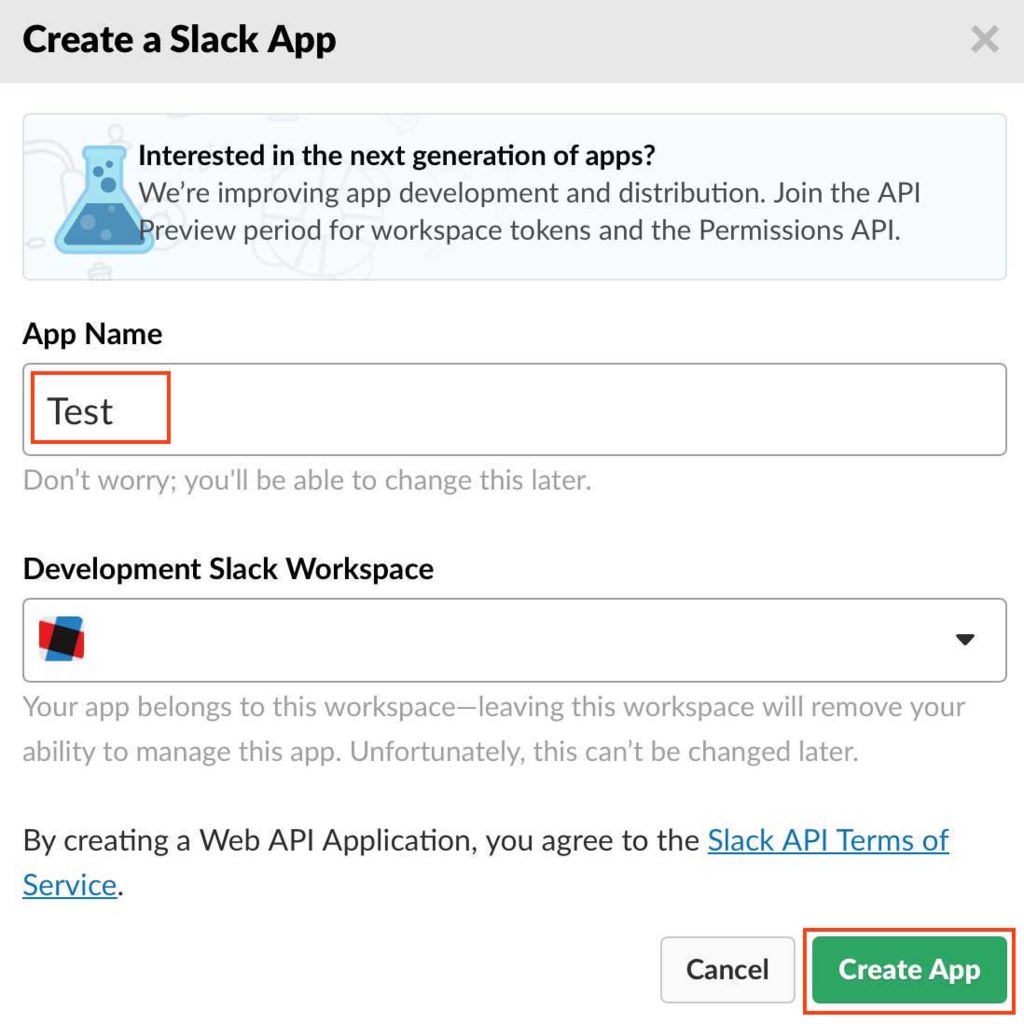
まずは中央のStart Buildingをクリックし、続けて表示される「Create a Slack App」の欄に作成するアプリの名前を指定ます。指定できたら「Create App」ボタンを押して下さい。

f:id:nn_hokuson:20171011204120j:plain:w400

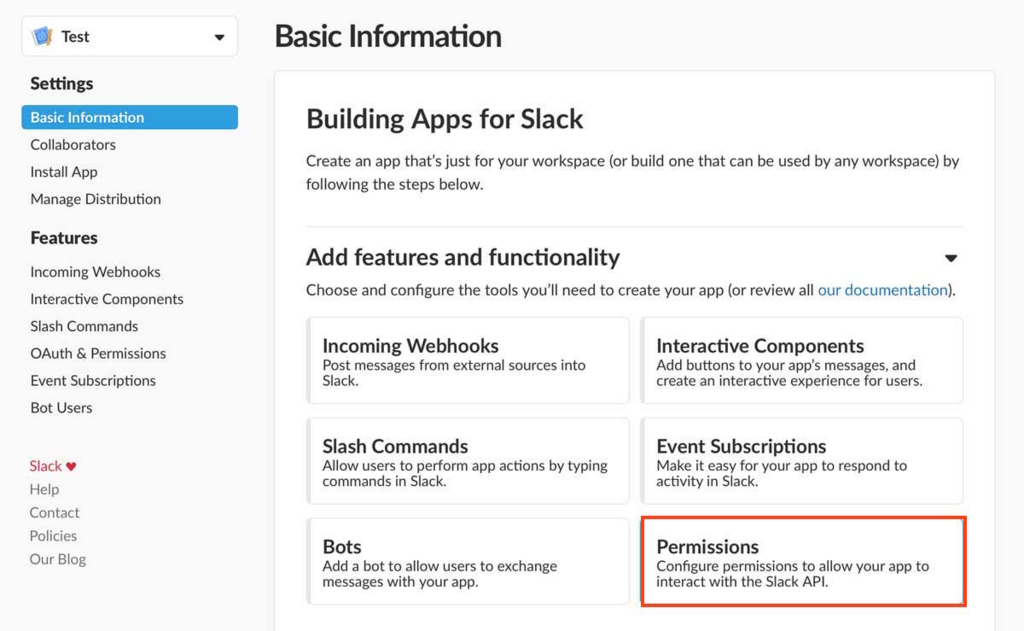
続いて、表示された画面から「Permission」のボタンを選択してクリックして下さい。

f:id:nn_hokuson:20171011195647j:plain

Slackでの認証設定とTokenの発行

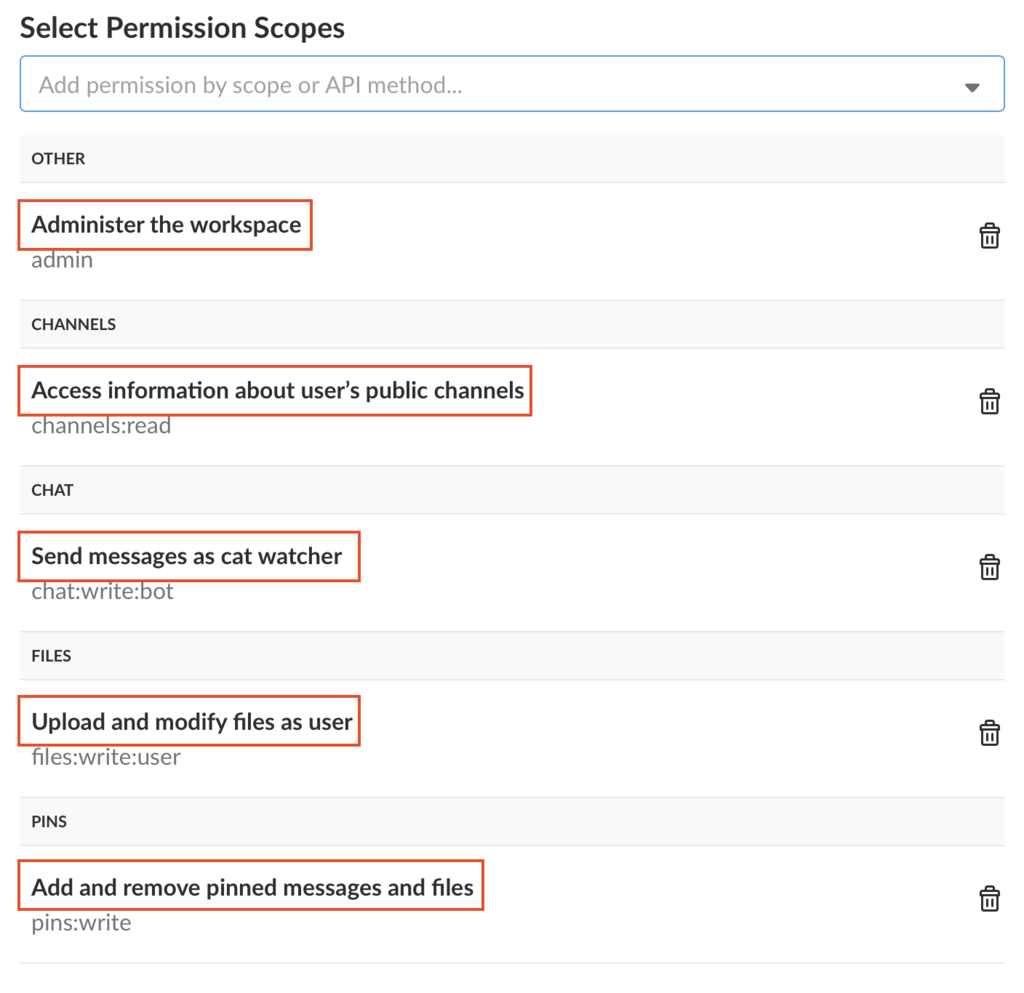
「OAuth & Permissions」のページが表示されるので、画面下側のSelect Permission Scopeの欄から次の5つを選択して下さい

  • Administer the workspace
  • Access information about user's public channels
  • Send messages as アプリ名
  • Upload and modify files as user
  • Add and remove pinned messages and files

f:id:nn_hokuson:20171011200234p:plain:w500

最後に「OAuth & Permissions」のページの「OAuth Tokens & Redirect URLs」の項目の「Install App to Workspace」をクリックし、遷移後のページで「Authorize」ボタンをクリックするとSlackのTokenが発行されます。

f:id:nn_hokuson:20171011200449j:plain

Slackへの投稿プログラムの作成

Raspberry piでSlackへ投稿するプログラムを簡単に作れるように、PythonのSlackライブラリ「Slacker」を利用することにします。

次のコマンドを入力してSlackerをインストールしておきます。

sudo pip install slacker

続いて次のpythonプログラムを作成して、capture.pyというファイル名で保存しましょう。

import commands

commands.getoutput("raspistill -w 1200 -h 900 -o test.jpg -ev 3 -ISO 800")

from slacker import Slacker
token = "<Slackのトークン>"
slacker = Slacker(token)
channel_name = "#" + "<チャンネル>"
result = slacker.files.upload('/home/pi/test.jpg',channels=['<チャンネルID>'])
slacker.pins.add(channel='<チャンネルID>', file_=result.body['file']['id'])

「Slackのトークン」には先ほど作成したtokenを設定してください。「チャンネル」には使用するSlackのChannel名を指定してください。私はChannelにgeneralを指定しました。「チャンネルID」はチャンネルを選択したときに表示されるURLの「https://xxxxx.slack.com/messages/チャンネルID/files/」で確認できます。

Pythonファイルが作成できたら次のコマンドを入力して実行してみてください。

python capture.py

うまくいけば、Slackの指定したチャネルに画像が投稿されているはずです。

f:id:nn_hokuson:20171011201346j:plain

一定時間ごとに自動的に撮影するようにする

一定時間ごとに、先程のupload.pyスクリプトを実行することで、猫の定点観測ガジェットの完成です。

Linuxで一定時間ごとに何かをするにはcrontabコマンドを使います。まずはcrontab.txtというファイルを作り、その中に次の内容を入力してください。

*/30 * * * * python /home/pi/work/capture.py

暗号のように見えますが・・・これで30分ごとにcapture.pyが実行されます。crontabの入力は次のように、分・時・日・月・曜日を指定できるようになっています。

分 時 日 月 曜日 コマンド

crontabの詳しい書き方は次のページなどを参考にしてみてください。

www.server-memo.net

次のコマンドを入力して、いま作成したcrontab.txtをcrontabに設定しましょう。

crontab crontab.txt

あとはRaspberry Piに電源を繋いで置いておくだけで、自動的にSlackに家の様子が定点観測出来るようになります。お出かけ中や寝ている間に、猫が何をしているのか??という謎がとけますよ〜!(うちの猫はずーーっと、寝続けていました笑)

f:id:nn_hokuson:20171011205352j:plain

【Blender】ボーンを入れる(リギング)ための基本手順

BlenderでうまくいかないところTOP3といえば、アニメーション、リギング、あとは・・・UV設定?かなーと思います。この記事では、3Dモデルにボーン(Rig)を入れるリギング(Rigging)について紹介していきたいと思います。

f:id:nn_hokuson:20171003203905j:plain:w500

Blenderを使ってメッシュにボーンを入れる方法や、IKの設定方法は次の「MikuMikuDance キャラクターモデルメイキング講座」にめちゃくちゃ詳しく図解で説明されているので、ぜひ読んでみて下さい。題名がMikuMikuDanceになっていますが、ガッツリBlender本です。なんか損しているような・・・笑

今回の記事の内容は次のとおりです。

メッシュを1つのメッシュにまとめる

まずは、作成したばらばらのメッシュを、1つのメッシュにまとめます。オブジェクトモードでAキーを押し、すべてのメッシュを選択した状態で「Ctrl+J」を押してください。

f:id:nn_hokuson:20171003194935j:plain

ボーン(アーマチュア)を入れる

続いて作成したメッシュにボーンを入れていきます。Blenderではボーンのことをアーマチュア(Armatuar)と呼びます。まずはオブジェクトモードで「Shift+A」を押しアーマチュア->単一ボーンを選択してください。

f:id:nn_hokuson:20171003195034j:plain

画面にボーンが一つ表示されるので、通常のメッシュと同様にしてgキーやsキーを使って移動・拡大縮小しながら背骨のあたりに移動してください。

f:id:nn_hokuson:20171003195304j:plain:w450

ここで、ボーンの見え方の設定をしておきましょう。いま作成したボーンを選択した状態で、画面右側の人型のタブを選択し、「表示」の項目の「レントゲン」と「名前」にチェックを入れます。これにより常に前面にボーンとボーンの名前が表示されるようになります。

f:id:nn_hokuson:20171003195549j:plain:w200

続いてボーンを伸ばしていきましょう。編集モードに変更しボーンの頭の球を選択します。この状態で「Eキー」を押してボーンを押し出し、頭にもボーンを入れます。

f:id:nn_hokuson:20171003195706g:plain

同様にして、最初に入れたボーンの頭から左腕、右腕のボーンを入れます。

f:id:nn_hokuson:20171003195749j:plain

左腕と右腕は別々にボーンを設定しても良いですが、編集状態で左のパネルから、オプション→X軸ミラーを選択しておき、ボーンを押し出す際に「Shift+E」を押すことでX軸に対称なボーンを自動的に設定することもできます。

f:id:nn_hokuson:20171003195957j:plain:w550

足はX軸ミラーを使って作成してみました(個別に入れても全然問題ありません)

f:id:nn_hokuson:20171003200021g:plain:w400

全体的には次のような感じになりました。

f:id:nn_hokuson:20171003200147j:plain:w250

人型のボーンを使いたい場合はRigfyという便利なツールも用意されています。Rigfyを使ったボーンの入れ方についてはこちらの記事で紹介していますので、合わせて参考にしてみてください。

nn-hokuson.hatenablog.com

ボーンとメッシュを関連付ける

オブジェクトモードでメッシュ->ボーンの順番に選択し(順番が大切です!)、「Ctlr+P」を押してください。メニューから「自動のウエイトで」を選択するとメッシュがボーンの子要素になり自動的に関連付けられます。

f:id:nn_hokuson:20171003200334j:plain

「Ctlr+P」を押したときに「ボーンヒートウエイト」というエラーが画面右上に表示されたときの対策方法はこちらをご覧ください。

nn-hokuson.hatenablog.com

ここで一度ボーンを動かしてみましょう。ボーンを動かすには、ボーンを選択した状態でポーズモード(またはCtrl+Tab)にして、動かしたいボーンを選択します。選択されたボーンは水色になります。

f:id:nn_hokuson:20171003203544j:plain

この状態で「rキー」を押してボーンを回転してみてください。腕のメッシュが合わせて移動します。

f:id:nn_hokuson:20171003203605g:plain

ボーンを色々動かしてみて、すべてのボーンとメッシュがうまく対応付けられていればリギングは終了です。ただしこれは、かなりのハッピーケースで、普通は変な挙動になるボーンが出てきます。今回だとメガネのメッシュが、頭のボーンとうまく対応付けられていないようです。

f:id:nn_hokuson:20171003203629g:plain:w220

ボーンのウエイトを調節する

メガネが取り残される理由は「メガネのメッシュとボーンの関連付け」に失敗しているからです。これを視覚化できるウエイトペイントと呼ばれる機能を使ってみましょう。

まずはボーンを選択してポーズモードにします。続いてメッシュを選択してウエイトペイントモード(Ctrl+Tab)にして下さい。

このように、ボーンとメッシュはそれぞれ異なる編集モードを持てます。Blenderを使っていてコレに全然気が付かなかった・・・・各モードを設定すると次のような画面になります。選択されたボーンに関連付けられているメッシュほど赤く、無関係なメッシュほど青く表示されます。

下の状態では、背骨のボーンに胴体が関連付けられているのが分かりますね。

f:id:nn_hokuson:20171003203905j:plain:w500

右クリックでボーンを選択すると、それぞれのボーンに関連付けられているメッシュを見ることができます。

f:id:nn_hokuson:20171003204703g:plain

頭のボーンを選択すると眼鏡だけが青くなっています。ウエイトペイントモードではペイントソフトのようにメッシュに色を塗ることができます。ここではメガネを赤く塗り直しましょう。

画面左のパネルでツールを選択し、ウエイトが1.0(赤色)になっていることを確認してからメガネを塗りましょう。

f:id:nn_hokuson:20171003204113j:plain

塗り残しがあるとボーンを動かしたときに、塗り残したメッシュのみ移動しない気持ち悪い感じになります。今回の場合は眼鏡のつるを塗り忘れているようです。

f:id:nn_hokuson:20171003204124g:plain

マスクを使ってウエイトペイントする

メッシュの裏側など、非常にペイントしにくい部分をペイントする場合にはマスク機能を使います(が・・・ちょっと特殊なので、頑張って塗れそうなところはペイントしちゃってください笑)。マスクを使えば、不要なメッシュを非表示にしてペイントすることができます。

まずはマスクモードに入るため、マスクボタンを押してください。続けてマスクしたい(非表示にしたい)メッシュを右クリックで選択します。選択したメッシュに繋がる一連のメッシュを選択するには「Lキー」を押してください。ここではメガネのレンズ部分を選択しました。

f:id:nn_hokuson:20171003204403j:plain

選択した状態で状態で「Hキー」を押すとマスクされ、選択したメッシュが非表示になります。

f:id:nn_hokuson:20171003204439j:plain:w400

これで眼鏡のつるが塗りやすくなったので、これを塗っていきましょう。ただ、マスクモードでは普通にペイントすることはできません。塗りたいメッシュを右クリックで選択してからペイントします。

f:id:nn_hokuson:20171003204636j:plain:w400

マスクしたメッシュを再度表示するには「Alt+H」を押してください。左側のつるも修正してからボーンを動かして、破綻なくどうさすることを確認しておきましょう。

これでもうまく動かないときは・・・

今回は眼鏡のメッシュを頭のボーンに関連付けるだけでうまく動作しました。これでもうまく動かない場合は眼鏡が別のボーンに関連付けられている可能性があります。この場合は、そのボーンを選択した状態でメガネを青色に塗りつぶすことでうまく動作するようになります。

[asin:B091KQFSRC:detail]

【Unity Tutorial 】How to make a shooter game

In this article, I'd like to introduce how to use Unity by making a simple shooter game. This article consists of 3 part.

  1. move the rocket and fire bullets.
  2. drop meteorites and collision detection
  3. make UI and game over

We are making the shooter game and scripts according to the book "Unity's textbook" written by me, so please refer to this book as well.

Overview of this shooting game

The game we are going to make will look like this.

f:id:nn_hokuson:20160702231742g:plain

Move your ship with the left and right keys, and shoot the bullet with the space key. Meteorites falls from the top of the screen, you should move ship and shoot the bullet and destroy it. If the meteorite goes beyond the bottom edge of the screen, the game will be over.

Create a Unity project

Let's create a Unity project. On the Unity startup screen, input the project name "Sample Shooting" and select the game type "2D".

f:id:nn_hokuson:20160703084730p:plain:w500

Next, select the screen aspect. Our game use a portrait screen layout, so click the Game tab and select the aspect ratio. Unity does not have a vertical aspect ratio , so click on the bottom "+ button" and select "Aspect Ratio" for a Type field and input "9: 16" for Width & Height field.

f:id:nn_hokuson:20160703085223p:plain:w500

Drag and drop the assets used in this game to Unity's project view. Assets for our game can be downloaded from the following URL.

www.dropbox.com

Let's add a rocket image to a scene view

At first, we gonna add rocket image(In Unity2D, image is called "sprite") on your scene view. Drag and drop the rocket sprite from the project window into the scene view.

f:id:nn_hokuson:20160703090750p:plain:w500

The rocket will be displayed on the screen.

The rocket sprite added in the scene view is also listed in the hierarchy view. Remember that the sprites on the scene view are correspond to thd list in the hierarchy window .

f:id:nn_hokuson:20160703091057p:plain:w500

You can change the position of the rocket from the inspector. When you select "rocket" in the hierarchy view, the rocket details are displayed in the inspector on the right side of the Unity editor.

In this example, change the rocket position to (0, -4, 0).

f:id:nn_hokuson:20160703093231p:plain:w500

Move the rocket

Next, Create a C# script to move the rocket with the left/right key. In Unity, you can use programming languages ​​such as C# or Javascript. Here we gonna develop our game using C#.

Right click on a project window and select "Create" → "C# Script", and
then change the file name to "RocketController.cs".

f:id:nn_hokuson:20160703093649p:plain:w500

Double click on RocketController.cs and open the code editor(Mono develop or Visual Studio) and enter the following script.

using UnityEngine;
using System.Collections;

public class RocketController : MonoBehaviour {
	void Update () {
		if (Input.GetKey (KeyCode.LeftArrow)) {
			transform.Translate (-0.1f, 0, 0);
		}
		if (Input.GetKey (KeyCode.RightArrow)) {
			transform.Translate ( 0.1f, 0, 0);
		}
	}
}

This script checks whether the keys(LertArrow and RightArrow) are pressed by using the Input.GetKey() method. When these keys are pressed, use the Translate() method to move the rocket in the direction of the arrow key. Translate () is a method that moves the object in the direction and distance of the argument. Note that the argument is not the absolute coordinate of the destination.

Next, we attach the RocketController script to the rocket object. In order to move an object as written in a script, you need to attach a script to the object.

Drag and drop "RocketController.cs" from the project view to "rocket" object in hierarchy view.

f:id:nn_hokuson:20160703093927p:plain:w500

Press the play button at the top of the Unity editor. You can move the rocket with the right/left key.

f:id:nn_hokuson:20160703094256g:plain

Let's add bullet sprite

The flow of firing a bullet from a rocket is as follows.

  1. Place a bullet sprite and move it upwards.
  2. Make a "bulletPrefab" based on the bullet you created.
  3. Write a bullet generator script. In this script, make an instance of a bullet from Prefab when you press the Space key.

At first, add the bullet's sprite on the scene view. Drag and drop "bullet" object from the project window to the scene view. Since the position of the bullet is specified by the script, you can place your bullet anywhere.

f:id:nn_hokuson:20160703131017p:plain:w500

After the bullet is added, you should make a script to move the bullet upwards. Right click in the project window and create a script with "Create" → "C# Script" and change the file name to "BulletController.cs".

f:id:nn_hokuson:20160703131228p:plain:w500

Open the "BulletController.cs" and write the following script.

using UnityEngine;
using System.Collections;

public class BulletController : MonoBehaviour {
	void Update () {
		transform.Translate (0, 0.2f, 0);

		if (transform.position.y > 5) {
			Destroy (gameObject);
		}
	}
}

We use the Translate() to move bullets upward (y-axis direction) by 0.2f every frame. This is the very similar way we used to move the rocket.

Even if bullets are out of the screen, bullets will continue to keep moving. Since this is a waste of CPU power, let's destroy the bullets when bullets go beyond the top of the screen (y = 5).

Save the script and attach it to the bullet just as you did with the rocketController.cs. Drag and drop "BulletController.cs" in the project window to the "bullet" in the hierarchy view.

f:id:nn_hokuson:20160703131433p:plain:w500

You attach the script, press the play button and run the game. The bullet moves upwards.

f:id:nn_hokuson:20160703131736g:plain

Make bullet Prefab

Next, we will make a Prefab of the bullet. Prefab is like a blueprint, and you can easily duplicate the same object using Prefab.

Select "bullet" in the hierarchy view to create bullet Prefab and drag & drop it to the project window. Then change the created file name to "bulletPrefab".

f:id:nn_hokuson:20160703131918p:plain:w500

After you create the bullet Prefab, the bullet on the scene view are not necessary. This is because you can create bullets from the Prefab anytime if you have blueprint. So right click in a hierarchy window and select "Delete".

f:id:nn_hokuson:20160703132034p:plain:w500

Create an instance from Prefab

Next, create a script to generate an instance (duplicate) of bullet from bullet Prefab when the space key is pressed.

Open the "RocketController.cs" and modify the script as follows.

using UnityEngine;
using System.Collections;

public class RocketController : MonoBehaviour {

	public GameObject bulletPrefab;

	void Update () {
		if (Input.GetKey (KeyCode.LeftArrow)) {
			transform.Translate (-0.1f, 0, 0);
		}
		if (Input.GetKey (KeyCode.RightArrow)) {
			transform.Translate ( 0.1f, 0, 0);
		}
		if (Input.GetKeyDown (KeyCode.Space)) {
			Instantiate (bulletPrefab, transform.position, Quaternion.identity);
		}
	}
}

In this script, we use the GetKeyDown() to detect that the space key is pressed. GetKey() returns true while the key is pressed, whereas GetKeyDown() return true only once when the key is pressed . When space key is pressed, make bullet instances from bullet Prefab. To create a bullet instance, we use Instantiate(). The Instantiate method requires three arguments:

  • Prefab
  • the position at which the instance
  • the rotation angle of the instance

Since transform.position is specified as the second argument, bullets are generated at the position of the rocket.

Finally, set the bulletPrefab to the "bulletPrefab" variable in RocketController script . Select rocket from the hierarchy window, and find the item "RocketController script" from the inspector, drag and drop "bulletPrefab" from the project window into the "bullet Prefab" field.

f:id:nn_hokuson:20160703152733p:plain:w500

Then bullets are fired each time when you press the space key.

f:id:nn_hokuson:20160703153002g:plain

The project file created this time can be downloaded following URL.

www.dropbox.com

Next article is as follow, please click here! (still Japanese)

nn-hokuson.hatenablog.com